Sunday, June 30, 2013

Chair makeover!!

I am painting these beautiful rattan chairs a burnt orange color called Copper Harbor by Sherwin Williams . First I cleaned and primed these chairs. After letting them dry for a few hours, I turned to my handy dandy paint sprayer! I turned the chairs over and sprayed underneath first, then did the rest! I let them dry overnight and applied and second coat! The paint I used was Sherwin Williams Proclassic, the same as I use for cabinets! It's a water based paint but acts like a oil based! The paint levels very nicely and leaves no spray marks or paint strokes! LOVE THAT!!! 

Check out the before and after....


Wednesday, May 29, 2013

Aldyn's kitchen

I've started another cabinet job and this one is desperately needed! Very dark wood, dark floors, dark wood moldings! We are gonna lighten the cabinets up with some antique white and brown glaze for a antiqued look! The room is already lightened up with just the primer!!  


THE WALLPAPER IS ALSO IN THE PROCESS OF BEING REMOVED!!


Prep work is the most important step...without it your paint will NOT stick!  SO be sure to properly clean to remove all grease and grime! Paint won't stick to that!  Sand surfaces to scuff them up a bit, or use a deglosser.  Choose a good primer. I tend to use a oil based primer or a shellac based primer to assure your paint adheres!! After priming is dried, you have to sand them down again lightly just to smooth them out.  You don't want rough surfaces, so the key is to SAND, SAND, SAND!!!
Now I am ready to paint!


Below is the cabinets just about done! All the doors are attached and the glazing complete!  Beadboard is being added to the ends of the cabinets to give it a more custom look!! Those will be glazed as well! Sorry about the quality of these pics... they were taken with my phone.  Better pics will be posted.  I was just excited about this transformation!  And as you can see, the wallpaper is down! woohoo! I can't wait to see this kitchen after the walls are painted.  


check out the before and after!!! 


Products I used...


Thursday, May 23, 2013

old entertainment center rescued!!!

I found this old UGLY entertainment and knew that I could make it so much better! Anything is better than the red, crackle paint that covered this thing, RIGHT?! 


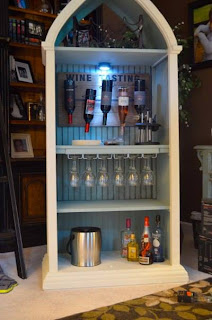
A coat of primer is a must before doing ANYTHING! I am using chalk paint for this piece so it does not need primer but I wanted to make sure the red was covered! After much contemplating about what to do with this piece, I have decided to make this into a ONE OF KIND BAR! WHAT??!!  That's right, this is gonna make a FABULOUS bar! 


Annie Sloan chalk paint at its best, yet again!!  Old White covered the outside with Duck Egg on the inside.  I'm gonna add a beadboard backing to make it look even better!  

So here is the final product!  The beadboard has been added, painted Duck Egg, then glazed with Valspar's Antiquing Glaze in black.  It looks phenomenal! I bought the "Wine Tasting" sign at Bed Bath and Beyond and it is PERFECT for this! 


I also added 2 wine glass racks the to middle section and it can hold up to 24 wine glasses!  A small puck LED light also adds a cool little touch! 


You can really see the black glaze on the beadboard.  It looks so cool, giving it an awesome antiqued look!  It definitely makes a difference. 

There is plenty of storage in this piece for ALL your bar essentials!

A ONE OF A KIND BAR
**FOR SALE**  $650.00 
Price reduced to $499.00 OBO!


Friday, May 3, 2013

PORTFOLIO!

A QUICK LOOK AT SOME OF THE THINGS I'VE DONE!!

*not available*

hanging in my daughters room

window boxes (made from old windows)

bathroom vanity

half bath vanity

*not available*

*SOLD*

*SOLD*

*not available*

*not available*

*SOLD*

*not available*


*SOLD*

*FOR SALE*  $75.00  after I get new hardware!

Monday, April 29, 2013

Goodwill Cabinet!

I love when I go into Salvation Army or Goodwill and find GREAT pieces!!! I went into Goodwill over the weekend and saw this wood cabinet.  I was a little skeptical at first but for the price, I knew it should be mine!! It doesn't have any detail on it but I figured ANY color paint would look great on it!  

So I chose my handy dandy Annie Sloan Chalk Paint (ASCP) and went to work!  I chose 2 very popular colors, Paris Grey and Duck Egg Blue.  Everyone I know, LOVES Duck Egg Blue! 

The nice thing about the ASCP, is that you don't have to sand OR prime!!  It's a fabulous paint to for ANY project!  


 The Cabinet with a coat of Paris Grey

The paint dries pretty fast and within a couple hours, I painted the Duck Egg over the grey.  I love distressing and the ASCP makes it so easy to do it!  With a clean damp cloth, wipe off the areas of normal wear!  With a little elbow grease, the paint will come right off!  I particularly like where some of the grey comes through! For heavier distressing, use sandpaper or a sponge with that green rough side! 

 Clear Wax applied with a clean, lint free cloth.  Work in small areas and after you apply the wax, quickly wipe off excess!  Applying the dark wax works the same way.  If you feel like you have to much dark, take a little clear wax and "erase" those areas!  It takes a little practice to get the look you want! 
I actually didn't like the texture that I saw between the Duck Egg and the grey so I sanded the top and made it REAL smooth!  I like it much better now!!! 

This piece will look great in ANY space.  It has great storage space inside making it a MUST HAVE!!!


Friday, March 29, 2013

Vintage table

I bought this little gem on Craigslist!! I thought this would be a really fun piece to paint. I choose an Annie Sloan color- Florence. It's an awesome mixture of green and blue- sort of like a deep teal! Beautiful!!!

I cleaned up the table a little and fixed some of the cracked areas on the top with some wood filler. After that dried, I sanded and applied 2 coats of paint. This stuff goes on really easily and took me no time at all!!

Waxing comes after the paint has dried. I applied the clear wax first, doing small areas at a time. After you apply the wax, you have to buff it out which produces that nice little sheen finish!

Time for some distressing... I took my handy dandy 180 grit sandpaper and went to town! I did all the edges pretty heavily and did some areas along the sides! It's awesome!

I plan on going over the whole thing with the dark wax, same technique as the clear. The dark wax is awesome because it gives it more of an aged, antiqued look!!

Just have add some new funky hardware and we will be all set!!

This table is for sale!! $100