I am so excited about my rescue from Salvation Army!! I got this steal for only $40! It was actually a real pretty piece as is, but the top needed a little help and the hardware had to go! My intention all along was to paint it, but I had to figure out where in the house this would go because that would determine the color. I didn't want to do black because I've already done that a few times and I wanted to try something different. I wanted to try Annie Sloan's chalk paint since I've heard so many great things about it. NO SANDING, NO PRIMING!! That had me sold on trying it!
I found a vendor that sold the good stuff and decided on my color. I'm keeping this piece in my office where the walls are brown. I have a rug that's brown with blue, gray swirls in it so I wanted a bluish color for the project! I chose the Duck Egg blue and bought both the clear and dark wax.
 |
| THE BEFORE... |
 |
| 2 COATS OF DUCK EGG CHALK PAINT |
 |
| SIDE VIEW- love the beadboard and scrolls on the side! |
As you may recall from the original photo, the two doors on the front have tin on them. The paint just went right on and covered it beautifully! No worries there. This stuff sticks to ANYTHING!
The paint dries really fast, making this paint even better!
I applied the clear wax in sections, using a clean, lint free cloth. Apply in circles, just like waxing a car. Once you do a small section, go back and buff the area. That produces the nice sheen look! It does take a while to do this step and you will get a arm, shoulder, and upper back workout as you do it! BONUS!
Apply the clear wax first then once that dries (24 hours later) apply the dark wax. The clear wax underneath makes the dark wax more workable. Apply the dark wax in small sections as well, paying close attention to the little imperfections and dents in the wood. The dark wax will make those areas more visible making it look more aged! I love that! I applied with dark wax with a small paint brush and just brushed it into the corners and across the surface. I used a little more in the corners to make it stand out. Using a clean, lint free cloth, wipe off the excess.
If you have applied too much dark wax and it won't come off easily, use a little of the clear wax to "erase" it. I did this on some of the flat surfaces like the top and fronts of the drawers. I would recommend paying more attention to the corners and barely brushing across the flat surfaces. You will brush the dark wax on then kind of spread it out with the cloth, leaving more or less depending on the look you want!
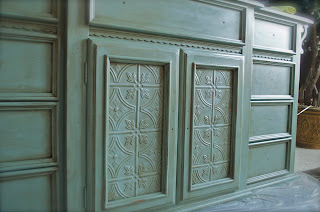

After the dark wax had dried, ( a few hours) go back and buff all the surfaces with clean, dry cloth again, to make it a little shiny! It will be beautiful.
Now I have to find just the right hardware!!!
Happy Painting :-)
please feel free to comment with any questions you may have!
I posted a link to Annie Sloan's website for a list of colors!
http://www.anniesloan.com/acatalog/paints.html